How to Install the sus-PEN-ded Holder
Easy instructions on how to install your new sus-PEN-ded holder.
Mounting Your sus-PEN-ded Holder Correctly

Installation Sequence
- Establish where the sus-PEN-ded Holder will be fitted
- Remove the components from the packaging
- Feeding the Nylon Line
- ROUGH SURFACE Fitment - Use Fiberite glue
- SMOOTH SURFACE Fitment - Use double-sided tape
- Fit the Rubber Pen Holders
- Trial Fit the sus-PEN-ded Holder to the Ceiling
Only applies to the SMOOTH SURFACE fitment - Make final fitment
Start with the End in Mind
Here are some places where you can find a sus-PEN-ded holder 'hanging out'.
How To Install
Ensure that your ceiling height or mounting surface is between 2 and 3.6 meters - measured from the floor.
A - Take out your new sus-PEN-ded unit, remove the side pins and keep them safe for later.
B - Lift off the lid and take out the contents from inside.

Feed the line supplied through one of the holes at the bottom of the holder then over the shafts exiting through the other hole.

Push the end of the line into the top of one rubber grip, then through one bead. Make a strong knot (looping over the bead) to anchor it. Trim the excess line to only leave 10mm. Pull back the line so the bead is nestled in the back of the grip.

Inspect the surface above your writing area as it will need to be dry, free from fat/ oil or dust, to ensure a strong bond. Optional screws and plugs are provided for extreme cases. ( Areas around air-conditioner outlets are suspect to be dirty and should be cleaned with a detergent. )
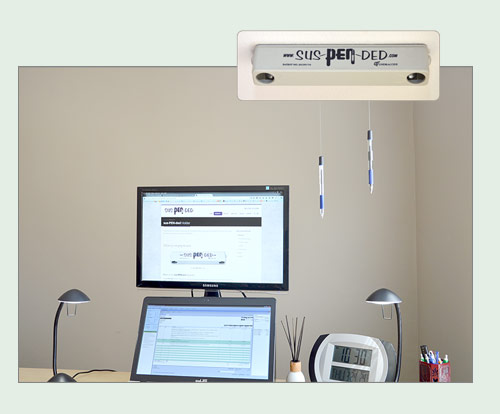
Get on your stepladder with the bobbin of line, sus-PEN-ded Holder and a pencil. Hold the holder to the ceiling while feeding out some line from the bobbin for the dangling rubber grip to almost reach your writing surface. Move the holder around until you are satisfied with the dangling grip’s position - this is where your pens will hang. It is advised that the pens will hang one on the left and the other on the right rather than one behind the other. You should be able to read the “sus-PEN-ded” logo printed on the unit when in use. Mark the holder’s position with the pencil.
According to the texture or material of your mounting surface, choose one of the fastening methods supplied before placing the lid back onto the holder and securing it with the pins again.
Please NOTE: We recommend the use of RE-USABLE ADHESIVE for your first attempt as it is not permanent and you can move the unit around until 100% satisfied with its final position. Remark the spot and proceed with the final fastening method of choice.
A - Extra Rough Surfaces or a Temporary Installation.
Use the piece of RE-USABLE ADHESIVE supplied for extremely rough surfaces or as a less permanent option.
Place the lid back onto the holder and secure it again with the pins.
RE-USABLE ADHESIVE should be warmed up before put to use - stretch it out, fold it back together and stretch it out again - a few times. Use a few pieces spaced out on top of the lid.
As this type of adhesive will let go sooner or later, especially when used near a heat source, please monitor your installation or rather use the screws and plugs supplied as a more secured alternative method.
B - Rough Surfaces
Use the FIBERITE adhesive and spoon to put blobs on the top of the lid. Judgement should be used on the quantity applied depending on the roughness of the surface. Press the lid firmly onto your pre-marked spot and leave to dry for 3 - 5 hours.
Once the adhesive has dried on the surface, place the holder onto the lid and secure it again with the pins.

C - Fine Textured or Smooth Surfaces
Use the double-sided tape in this package. Place the lid back onto the holder and secure it again with the pins. Peel the protecting film from one side and stick it firmly to the top of the lid. Peel the remaining film and stick the unit on your pre-marked spot.
(Please be careful when affixing the sus-PEN-ded holder as you only have one chance)

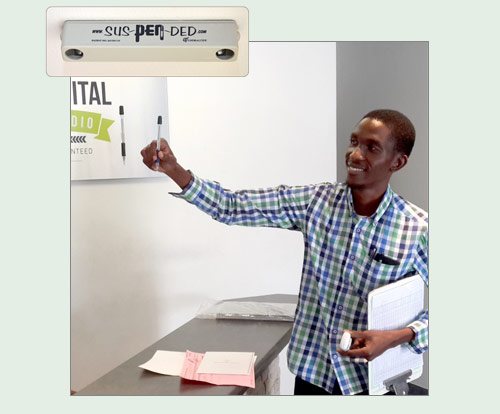
D - Lay-In Grid Ceilings
The SlippaGuide is a grid-ceiling clip that was designed by Tundracode to allow a fast and less permanent installation of the sus-PEN-ded Holder in corporate environments where a Lay-in Grid ceiling is fitted, as shown in the photo below.
Place the lid back onto the holder and secure it again with the pins.


Peel off roughly 3cm of the white film from the double-sided tape supplied. Place the sticky side down between the two guides of the SlippaGuide. (Pic. 1)
Use a sharp blade to trim the tape to the same width as the SlippaGuide. (Pic. 2 and 3). Repeat this with the second SlippaGuide.
Peel off the remaining green sides of the tape and stick the clips near the edges on the lid facing the same direction.
Press them down firmly.
Lift the desired ceiling panel just a bit and slide the unit in all the way onto the metal strip. Let the panel down again to hold the unit in place.
Know that your pens will have to hang in the lower half measured from writing surface to mounting surface to allow for enough travel.
The unit is now mounted and the earlier attached rubber grip is hanging within comfortable reach from the position you will be writing from - standing or sitting down. Cut the line from the bobbin’s side about 10cm lower than the hanging grip. (Hold on to the line above the scissors ☺). Repeat the grip and bead procedure to attach the second grip.
Push the rubber grips over the back of the two pens (or a pencil and a pen) of the same weight.
Pull either pen down to use. The other pen will go up and away from you. The pen in its pulled-down position may stay on the writing surface until you are done, or simply push it back up and the other pen will come down within reach. Don’t throw them up as the swinging motion could tangle the lines. If this happens, take any one pen and pull it downwards while keeping a LITTLE tension. This will cause them to untangle. Sometimes a small tug or two is needed to initiate this.


For more options, TIPs and Tricks, click here.
Get the most out of your sus-PEN-ded!
In order to get the most out of your sus-PEN-ded Holder, follow this advice: